
: A "search jump" option allows the user to search for a specific set of libraries. After choosing this option, a selection form is displayed:
Select the required criterion and click , the system takes you the screen nearest to the searched for library.
: Select a library and then this option, a summary screen will be displayed:
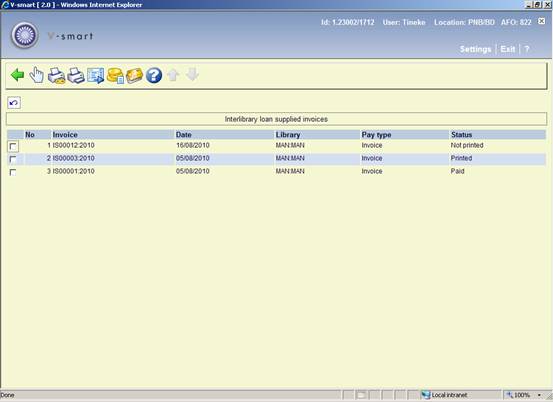
: Select a line and then this option to display the requests associated with the invoice. See section 822.4.7.1.
: Use this option to print all invoices as yet unprinted. The standard screen for generating mailmerged output will be presented. (See also the general help on mailmerge).
: Select a line and then this option to print the invoice. The standard screen for generating mailmerged output will be presented. (See also the general help on mailmerge).
: This job is a standard “batch task” in Vubis – it may be run online, in batch or as a regularly scheduled task in “memory”. See section 822.4.7.2.
: Select a line and then this option to pay the invoice. See section 822.4.7.3.
: This option is not yet implemented.
: Select a line and then this option to display the requests associated with the invoice.

: This option is not valid here.
: Select a line and then this option to display the details of the request. See the help of AFO 821 for an explanation of this input form.
: A "search jump" option allows the user to search for a specific set of requests. After choosing this option, a selection form is displayed:

Select the required criterion and click , the system takes you the screen nearest to the searched for request.
: job is a standard “batch task” in Vubis – it may be run online, in batch or as a regularly scheduled task in “memory”. When you choose this option, a selection screen will be displayed:

Select the required payment types by moving them to the right and click . The standard screen for scheduling jobs will be displayed.
: Select a line and then this option to pay the invoice. An input form will be displayed to allow a record of the payment to be recorded against the invoice
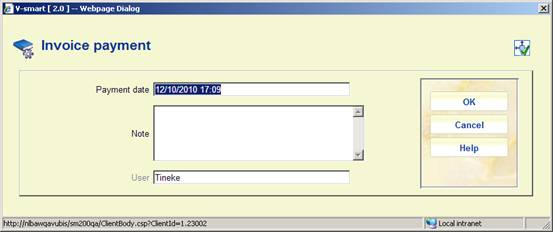
If the invoice has already been marked as paid, the previously entered details are redisplayed and may be amended.
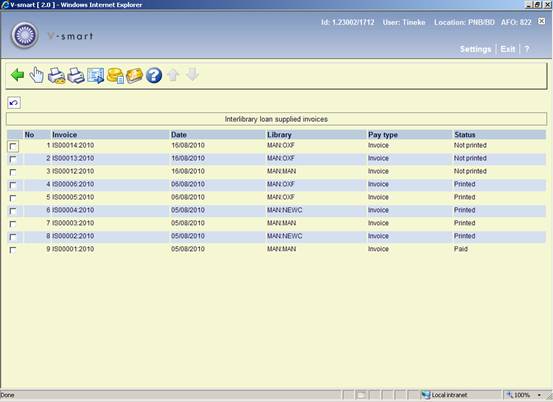
: Takes the user to the general invoice processing screen. The difference with the above option is that a listing is shown of invoices for all libraries.
The options are the same as described above for invoices of an individual library.
The following settings are all required for the ISOILL protocol. They cover settings for conditional responses, document supply medium and so on. Typically, the wording for these settings are offered to the user but are expressed in the protocol as codes (usually numeric).
In general we would not expect libraries to modify these settings.
The parameters are therefore supplied with the system, but the wording may be changed if you wish. In addition, the parameters also allow you to add additional settings. These settings can be associated with an ISOILL code, but this is optional.
However, if NO ISOILL code is defined then such a setting is disallowed for ISOILL protocol based requests.
For example, the "medium type" table supports the following standard settings
|
Description |
ISOILL coding |
|
Printed |
1 |
|
Microform |
3 |
|
Film or video |
4 |
|
Audio |
5 |
|
Machine readable |
6 |
|
Other |
7 |
For this table, you might add "Microfiche" but send this as type 3 for ISOILL requests; alternatively you might add "Handwritten" with no ISOILL code, in which case this would not be offered or allowed for ISOILL requests.
Notes
Settings which are system defined may NOT be deleted, nor may the ISOILL coding be removed or changed.
ALL such settings are defined on a system-wide basis – that is, adding a code for one library (ILL department) makes it available to all; or changing the wording for one changes it for all.
When offered as a setting for a specific request, the dropdown list displays the relevant "wording".
Finally, note that the ISOILL codes are DEFINED by the standard ISO 10161. When you enter your own codes you may enter ANYTHING in this field. NO responsibility can be taken for entering invalid data here, and its effect on the working of the system, the ILL transmission or impact on any other "partner".
Entering a new setting with an ISOILL code will always pop up a warning message:

After selecting this option a summary screen will be displayed:

Selection of one of these leads to a display, such as
: Choose this option to define a new code. See section 822.5.1.
: Select a code and then this option to modify the properties. See section 822.5.1.
: Select a code and then this option to delete the code. The system will prompt for confirmation. For ISOILL codes the system will display a warning you cannot delete them.
: Select a code and then this option to add text in different languages. See section 822.5.2.
After selecting the option or an input form will be displayed:

Add a Code and Description, optionally link to an ISOILL value.
These only apply for those settings which might be used on notices sent to the borrower in one of these contact languages. In other words, in some notices we may wish to send the description of the code, so we can send this in their contact language.
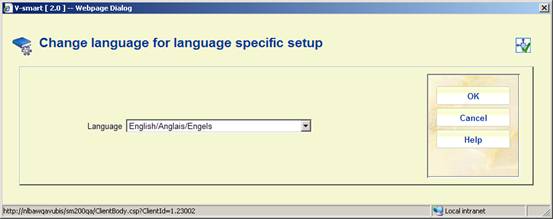
: Select a code and then this option, a screen listing all languages (as defined in AFO 482 – Borrower Authority Lists - Language) is displayed:
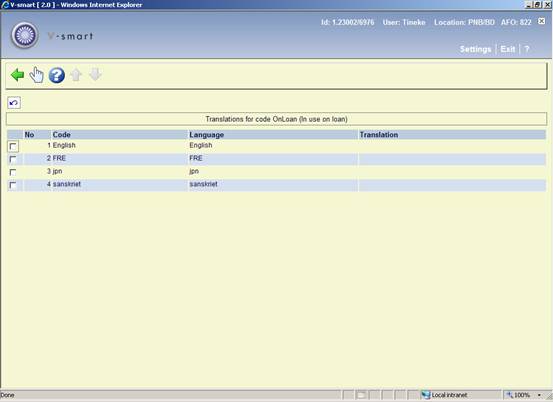
After selecting a language, an input form for the translation will be displayed:

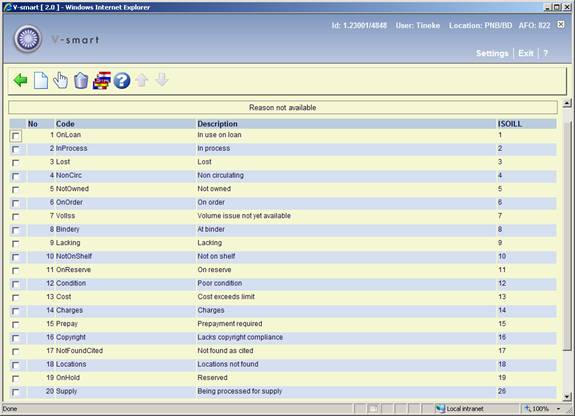
Below is an explanantion of some ISOILL codes, followed by some special codes.
Used to give a reason why the Not Supplied message is required.
In addition for a reason unfilled message, a notice code may be associated with this, for the delivery of an appropriate notice to the client.
These codes are used when a "Retry" reply is sent to the requesting library (or received from the supplying library).
This is a coded value to indicate a reason why the library is offering to supply the item in the near future.
Cancellation reasons may be attached to a cancelled request. These are non ISOILL codes and may optionally be used by the ILL department for internal statistics, and for the automatic generation of a cancellation note.
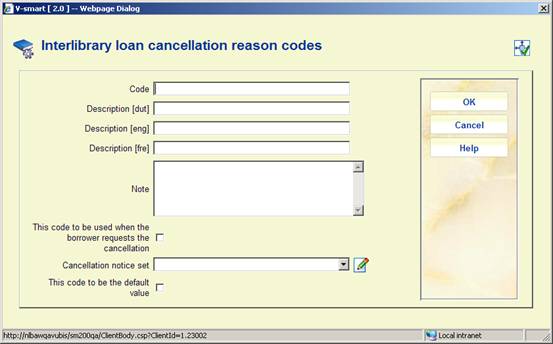
Code: A unique code identifying the reason.
Description <lang>: A brief description of the code in each language.
Note: this will be added automatically to the request when this cancellation is input by staff
This code to be used when the borrower request the cancellation: Indicates that this code will be set on the request when a borrower cancels the request from the WebOpac.
Cancellation notice set: The notice set for cancellations (as defined in AFO 822 – Notice sets – ILL Cancellation notices).
This code to be the default value: Tells the system what the default will be for staff cancellations.
Standard codes for copyright compliance are included but can be added to in the following table.

Standard codes are:
· BL:CFP Copyright fee paid
· US:CCG Conforms to Copyright Guidelines
· US:CCL Conforms to Copyright Law
“Client status” is a field in the ISOILL protocol, which may be defined when requests are transmitted with client information provided. This table may be used to configure valid statuses. Currently only “Good” or “Bad” are known as statuses ever seen in such requests.

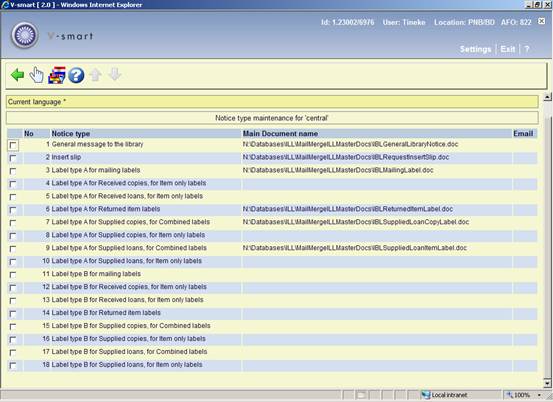
A whole range of notices are available to send to both suppliers, requesters and local clients. For ISOILL libraries such "notices" are delivered automatically and electronically according to the ISOILL protocol, but for other libraries such notices must be generated as textual items.
See also the matrix in chapter 9 of the general help on mailmerge.
In addition to notices, the system can also output mailing labels, insert slips and so on.
There are really then three main sets of notices
· Notices to other libraries
· Notices to clients
· Outputs for processing purposes i.e. for the ILL department
Notices to other libraries include the original request, general messages, cancellation requests, overdues, recalls and so on – there are 27 different types of notice available.
Internal outputs include a variety of mailing labels, insert slips and so on.
Notices to borrowers include availability notices, cancellation notices, status reports.
The actual layouts used can be defined for each library, if required. For example, for requests to North American libraries, the
Layouts can also be defined in the contact language of the library e.g. to send requests worded in Welsh to a Welsh library .
In order to avoid having to enter the layouts individually for (say) 27 notices for each library, or to define them individually for each ILL department, the system groups notices together into “Notice sets”. The set of notices can then be linked to a library – there may then be two or three different sets defined which can be applied according to the type of library.
There are therefore 3 distinct categories of Notice set …
· Sets for libraries
· Sets for the ILL departments
· Sets for the borrower.
Finally there is a fourth category – for cancellation notices – so that the wording of the notice can be tailored precisely to the reason for cancelling a request.
In general, the status of a request will be available to a client via the WebOpac. The sending of a 'printable' notice about some particular event in the lifecycle of an outgoing request is therefore simply a matter of policy for the ILL department. It would be expected that an explicit notice about the arrival of an item, for example, WOULD be sent to a client, but the fact that it has been shipped by the supplying library would typically not be sent.
The notices to be sent and the way that they are sent is defined for each request, according to a "contact method" setting, although the choice of sending a specific notice is sometimes a function of the type of notice. For example Cancellation of an outgoing request – in this case, if the cancellation of the request is at the borrower's demand then there is no point in sending them a cancellation notice!
Ad-hoc notices may also be sent to clients, either as email or printed notices.
Sending a notice to a client may be initiated in one of the following ways :
· When a request is cancelled, a "reason" may be assigned to the cancellation. For each reason a notice format may be associated. When the cancellation is entered, then staff have the option to send a notice to the client.
· When a request is marked as "unable to supply", then again a notice code is associated, and staff have the option to send a notice.
· At any time, an ad-hoc notice may be selected from any valid notice type.
· When a request is marked as supplied, manually, again staff may choose to send a notice.
Of course, on receipt of an item, it is possible for the system to automatically send a "request available" notice to the client.
It should be noted that such notices may be sent at any time. A history of notices sent is recorded by the system, but a previously sent notice MAY be printed under all circumstances (typically for reprinting, of course); a warning will be given if a previously selected notice is chosen.
Notices to clients may be printed immediately or may be "selected" but actually output as a separate process. Printing is always to a printer available to the PC on which the client is running, and may be a local or networked printer (i.e. as is usual for all such printing in Vubis).
We talk about a "notice code" for notices. This is really the name of a Mailmerge template. This notice handling is described in other documentation (See also the general help on mailmerge), but the following outlines the process.
When one or more notices are required, the system creates a file with ALL the possible fields and sends this file and the name of the template to the application. This automatically runs a mail-merge to merge the data fields and the template to create an output file. The output file can be automatically printed; it can be automatically emailed or it can be simply "left" on the screen for possible editing by the current user (presumably for subsequent printing, emailing or even saving).
A template might look like
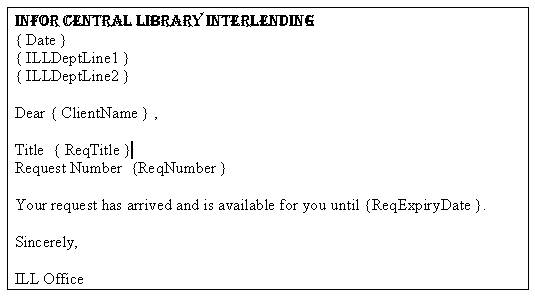
The text inside {}s is automatically replaced by the data pertaining to the specific request. It is emphasised that this is a Mailmerge master document file and the full features of word processing are available to make notices both elegant and appropriate to the context of the library.
A full set of example templates will be provided with the system (e.g. one for each of the standardly supplied cancellation reasons, one for each of the "not supplied" reasons).
Notices to requesting librarues are sent automatically for ISOILL libraries for most types of notice.
For non-ISOILL libraries, the following notices are available. For each type of notice, the required format (Word template) may be define on a per supplier basis. If no format is defined, then no such notice will be generated.
Several notice types are only generated if the appropriate "action" is manually initiated for the request (see the help of AFO 821 for Actions and Events) – for example, it is in principle possible to send a notice to tell the requesting library that you will supply the item, but this is only available IF staff go to the trouble of initiating such an event / action.
|
Notice |
Description |
|
Request |
The initial request |
|
Will supply |
Only generated if a will-supply action is initiated A distinct notice is available according to the nature of the Will supply 'reason' |
|
Not supplied |
Generated by a "not supplied" action, again with text configurable on a per "reason" basis |
|
Conditions |
Generated for a conditional response, again per type of condition |
|
Recall |
A recall for a loan |
|
Overdues |
A separate set of notices is available for recalled (and overdue) items |
|
Cancel |
Text on a per reason basis |
|
Message |
Ad hoc messages |
|
Renewal request |
A request to renew a loan |
|
Renewal reply |
A reply to a request to renew a loaned item |
|
Cancel reply |
Reply to a request to cancel |
|
Lost |
Notice about a lost item |
|
Damaged |
Notice about a damaged item |
|
Receipt |
Notice recording the receipt of an item |
|
Retry |
A notice to retry a request |
|
Hold placed |
Notice that a reservation was placed |
|
Locations |
Locations provided |
|
Supplied |
A notice that item has been supplied |
Some of these notices correspond to the ISOILL messages sent; in practice for manual requests, this full range of notices is unlikely to be used. We would also expect these to be sent when the actual method of sending the notice is by email; hardcopy is less likely. Nevertheless, these are all options for the library to use or not as they wish.
In addition, for ISOILL libraries, it is also possible to send "messages" in printed or email form. Normally, these would be sent by the protocol but this is an additional option (e.g. in the event that there is some problem with their ISOILL processing!).
As for clients' notices, the actual output mechanism is via Mailmerge processing, and according to context, notices may be generated individually or as a batch process.
Additional outputs are Supply and Return labels for the actual shipping of loan items.
For those notices which have been selected but not printed (or emailed) there and then, a separate menu option displays a list of the different notice types to be output.
(This is comparable to AFO452 in the sense that the possible notices required for printing/emailing are displayed grouped according to type of notice).
Since these are generated on an ad-hoc basis (i.e. specifically for each request) at any one time, the list displayed is for all outstanding notices. If they aren't output, then the list just grows.
At any time a specific type of output may be generated for individual requests. However, once a set of notices are printed (i.e. sent for actual output), then these are grouped together and kept for a library defined period so that they can be reprinted in bulk (for example, if the printer was actually misprinting for some reason).
Specific sets of such outputs may be selected – both on regular and reprinting. Criteria for selection include a date and time range (based on the time that the action causing the notice to be required was entered); the specific output format required (i.e. the Word template code); the responder library. It may also be based on outputting a simple range of entries – e.g. "output records 1-50" (although this is not entirely straightforward – at time of selection, the system simply cannot correlate this to pages output and so on (since this is a complex function of the Word processing)).
Any prints NOT printed immediately are put into a “deferred print” queue. Similarly outputs generated by “overnight” processing e.g. overdues are also generated automatically but then queued up for physical printing.
These may be found from the “Deferred prints” option from AFO 821.
The set of notices may be a function of either the department or the remote library, according to the type of notice. After choosing this menu option, a selection form will be displayed:
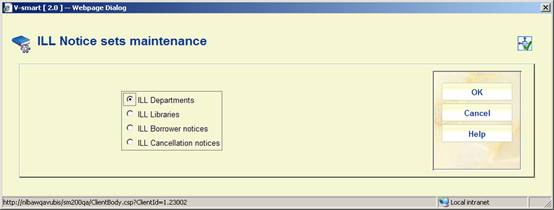
The options for each group are similar, so they are described only once below.
After selecting a group, an overview screen is displayed:

: use this option to add a new set. See section 822.6.4.1 for details.
: select a line and then this option to view or modify the details. See section 822.6.4.2 for details.
: select a line and then this option to delete the set. The system will prompt for confirmation.
: select a line and then this option to view or modify the general information. See section 822.6.4.1 for details.
: select a line and then this option to create a new notice set based on information in the selected record.
: use this to set the notice types to be used and their wording. See section 822.6.4.3 for details.
After selecting the or option, an input form will be displayed:

Here you can enter or modify the unique ID and descriptive wording for the set.
When creating a new set, you must next use the option to add the actual documents etc.
After selecting the option, an overview screen will be displayed:
If no “master document” is defined, then this implies, of course, that the output is simply not required.
: when selecting a line, an input form will be displayed:

Main document : is the name of the master template document for the mailmerge for printed output. (See also the general help on mailmerge).
Email : is optional and is used to redefine the layout when the notice is to be sent by email (e.g. to a borrower). If not defined, then the Main document setting is used to create the email.
Save output sets : allows the actual hardcopy to be stored on disk. The actual path of the output is stored against each request and can be reprinted or displayed from the display of the request history. A large file server may be needed for this option!
Email subject : is a subject line to appear on the email. It is also possible to configure the email notice to use mailmerge fields to appear as the email subject. (e.g. “Cancellation of request RQ1234” where RQ1234 is the request number being cancelled).
Paper size : is really only relevant and optional for labels. It can take any characters and is used to group labels appropriately. Typically labels would be printed on special label stationery – in which case, it may be necessary to load a printer with such stationery. When printing a whole set of labels, they are grouped (see below) as “Mailing labels” – however if there are several types of mailing label, then this setting allows you to separate out the different types – allowing you to load the correct stationery and then print them.
: This allows a separate main document/template to be defined for different contact languages. This is optional – but it allows for the fixed texts of a notice (or indeed the whole notice layout) to be changed according to the contact language of the user for whom the notice is destined.
After selecting this option an input form will be displayed:
After selecting a language, a screen similar to the main screen will be displayed (see above for an explanation). The current language will be displayed in the header of the screen:
![]()
: use this to set the notice types to be used and their wording. An overview screen will be displayed:

: after selecting a line an input form will be displayed for the wording in different languages:

: after selecting this option a form will be displayed where notices can be (de-)activated and set in a certain order.

This section outlines the general method for calculating the various types of charge within the module for Interlibrary loans. Since libraries calculate charges in a variety of different ways, the methods described below are potentially quite complex, and there may be several ways to achieve the same result. However, it is expected that for any one organisation the options used would be made up of just parts of the possible settings and would be simpler in practice than the general solution appears to be.
There are three different types of charge overall that need to be considered – how much does the library charge to supply material, how much does it charge its borrowers when requesting material from another library, how much does another library charge for supplying material.
Charge schemes are a way of defining the rules for determining how a charge for a request should be calculated. As will be seen below, the fields which can be used to determine this are
· Whether the charge is for incoming or outgoing request
· The service type (Loan or Copy)
· The item type
· The number of pages for a copy
· Whether the charge is to be made to a departmental budget
· Whether the charge is for a borrower for which copyright charges apply
· The service level (normal, rush and so on).
· The borrower category
· Whether the borrower's quota has been exceeded
There may be any number of different charge schemes defined in the system.
Once a scheme has been set up, then it may be “attached” to a Library record – this then defines how charges are calculated for
· Lending items to that library
· Borrowing items from that library
· Calculating charges to a budget account / or
· Calculating charges for an individual borrower
So, for example, if the majority of the libraries that requests are exchanged with have the same policies, then a single charge scheme may be defined and attached to all of these libraries. This means that only 1 set of rules need be defined AND changes to those rules can be applied as a single modification.
In practice, the system allows for considerable streamlining of the above.
Streamlining
Date ranges
It is also possible to define the rules for a range of dates, for a given scheme. This allows the changes for charging to be configured in advance. This, too, is optional in the sense that an open-ended range can be assigned easily.
Entering the rules
An amount is entered to the system for each combination of the possible fields available as criteria for the calculation. The system will select the most appropriate rule for calculating the charge. For example, we might have
· For Loans, for a book, for Academic staff: charge = 8.50
· For Loans, for a book, for Students: charge = 6.00
· For Loans for a thesis for Academic staff: charge = 12.00
· For Copies, for all types of borrower: charge = 6.00 + 1.00 per page
· For Copies, for External borrowers: charge = 12.00 + 2.00 per page
· and so on.
The last two rules, for example, show that a Copy costs 6.00 except for borrowers who aren't members of the library for whom the charge is 12.00. (In other words, it is not necessary to enter every unique combination).
Service levels
Although the service level (e.g. normal, rush etc) CAN be entered as one of the criteria used to determine the rule, it is also possible to allocate charges for specific service levels as additional amounts. This means that the number of combinations needed to be entered can be kept much smaller – the library would not need to repeat (for example) the rules for “rush” requests, “express” requests and so on.
If additional amounts are entered simply for the service level, then these are just added on to the amounts calculated for the specific combination.
Charge schemes are defined for each ILL department independently, so this option leads to a listing of the existing charge schemes defined for the department.
After selecting this menu option, an overview screen will be displayed:

: use this option to add a new charge scheme. See section 822.7.1 for details.
: select a line and then this option to view or modify the details. See section 822.7.2 for details.
: select a line and then this option to delete the scheme. The system will prompt for confirmation.
: select a line and then this option to create a new charge scheme based on information in the selected record.
After selecting the option, an input form will be displayed:
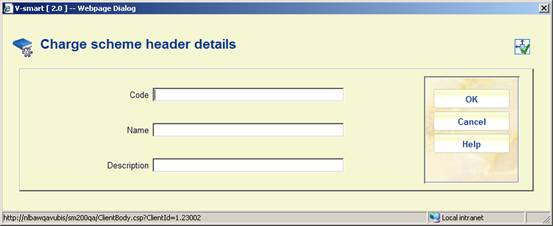
Enter a unique Code, give the scheme a Name and add a brief Description.
The name and description fields are multilingual i.e. they are entered in the language of the current user. Name is shown in most contexts, when the scheme is applied and description can be interpreted as a way of annotating the scheme.
After clicking on the form, another input screen will be displayed:
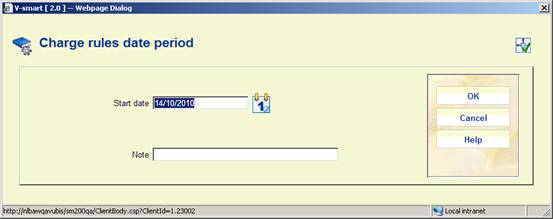
When adding a new scheme, the system always asks for a Start date of applicability, defaulting to “today”, of course. Adding a new scheme implies of course adding a new date, which implies adding the actual details of the rules, so when adding a new layer the system automatically takes you to the next step, but it is possible to cancel out of the process.
After selecting the option, an overview screen will be displayed:
: use this option to add a new charge scheme. See section 822.7.2.1 for details.
: select a line and then this option to view or modify the details. See section 822.7.2.2 for details.
: select a line and then this option to delete the rule. The system will prompt for confirmation.
: select a line and then this option to create a new charge scheme based on information in the selected record.
: This option shows the general definition. See above, only Name and Description can be changed for an existing code.
: Use this option to test the definition. See section 822.7.2.3.
: use this option to add a new charge scheme. The system first prompts for a Start date of applicability, defaulting to “today”:

After clicking on this form, a summary screen will be displayed:
See below for an explanation of this screen.
After selecting an existing rule period and the option an overview screen will be displayed:
First of all, the display is separated into the four main constituent parts - so we have
· Supply the charges to be made for lending the item to another library
· Request the charges to be made to the library for borrowing an item
· Budget the charges to be made when a budget account is used
· Borrower the charges to be made to an individual borrower
: Use this option to add a new rule. An input form will be displayed, see below for an explanation.
: Select a line and then this option to view/modify the details of a rule. An input form will be displayed, see below for an explanation.
: Select a line and then this option to delete the rule. The system will prompt for confirmation.
: After selecting this option the form with Start date will be displayed (see above).
: This option allows for two additional fields to be specified for this scheme. See below for an explanation.
: This option allows ADDITIONAL charges to be added to the charge calculated as described above. See below for an explanation.
: This option allows rules to be moved up and down. You can not move a rule to a different role section.
After selecting the or option, an input form will be displayed:
Charge type / role: This tells the system the type of charge that is being calculated i.e. the settings that come with this tell us how to calculate the charge.
· Supply is the charge we make on a requesting library to supply the item
· Request is the charge expected from the supplying library
· Borrower is the charge passed on to an individual borrower
· Budget is the charge passed on when this comes from a department budget
· Borrower over quota applies when “quotas” have been turned on. If the individual borrower has used more than their regular quota, then different charges may apply.
· Lending this may be used when the charges to the library are passed on in full to either the budget account or individual borrower. This saves 3 separate but identical settings having to be entered.
Service Type: The standard service type selection. This is optional if the library doesn't vary its charges for the specific role according to service type OR the charges for service levels are treated as additional charges.
Copyright payable: Select the required setting for this rule.
Item type: Optionally select a specific item type to which this rule applies.
Service level: Optionally select a specific service level to which this rule applies.
Pages range for per pages charges: You can specify a page range for additional charges. E.g. the cost for pages 1-10 is XX and then for each page from 11 upwards YY.
The “per page” charge is always an additional amount, implied by the Page range field being set.
Borrower category: Optionally select a specific borrower category to which this rule applies.
Charge amount: This is the actual amount to charge.
Admin Charge: When applying charges to a borrower or budget, the question arises as to exactly WHEN the charge is payable. Should it be charged (and become payable) when the request is placed. But, then it may be that the library cannot find the item from its usual suppliers, and has to do an expensive extended search at, say, the British Library. Some libraries have a policy of charging borrowers regardless of whether the request is supplied or not.
The Admin charge may be added to the charge scheme as a fixed amount, payable immediately the request is placed. It is therefore conceived of as an “administrative fee” rather than as a charge for the request; libraries are of course able to decide whether or not to use this feature.
This charge becomes payable when the request is entered into the system – either by the borrower from the WebOpac or by staff. At this point, of course, a supplier may not have been selected, so the charge scheme used would be the default scheme – and in theory this admin charge is probably NOT related to a specific supplier. (And is therefore not quite a general part of the charge scheme structure).
However, in order to keep the rules in a single “place”, the Admin fee is tied in with the other charging rules i.e. within the charge scheme mechanism.
For some libraries, especially publics, it may be that only the Admin fee is defined i.e. they define pretty much a fixed amount for loans, regardless of other considerations.
In the summary listing of the rules, if an Admin charge is defined for the rule, then this appears as / 2.00 following the charge amount.
The Admin charge ONLY applies to charges to borrowers or budgets i.e. for outgoing requests only.
Currency: It can be seen that a currency code can be assigned to the rules - for example, the charges made by a supplying library can be entered in their local currency. This is also true for charges that the library makes for supplying items to them. It should be noted that all the individual elements making up the charge must be in the same currency!
However for charges to borrower or budget, these must be in the local currency of the system
Note on the “Lending” Charge type / role
Many libraries choose not to pass on the full cost of a loan to the borrower or to a departmental budget (if only to make it easier to explain the charging to the borrower); hence the features of the system to allow a distinction to be made between the charge to borrower, to a budget and the actual cost to the library.
If the full calculated cost IS to be passed on, then the “Lending” charge type can be used, to save having to enter the three different categories of charging. There is, however, one limitation - since the charge amount for borrowers is in the local currency of the system, then necessarily the currency for the library charge must also be assumed to be in the local currency. The system will ensure that the currency entered IS the local currency, if the “Lending” charge type is used.
: This option allows for two additional fields to be specified for this scheme. An input form will be displayed:

Late return or lost fee: Charge made to the library on late return or if lost.
Refund: Refund made if a lost item returned.
These are a mechanism for storing such charges incurred by the library.
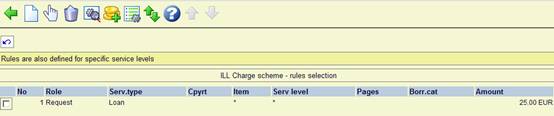
: This option allows ADDITIONAL charges to be added to the charge calculated as described above. This brings up a listing show all the defined standard service levels e.g.:

For any or all of these search levels, additional charges may be added by selecting the relevant line.
This brings up an input grid and workflow as for entering the main charges. In practice, the rules entered at this level would normally be very simple e.g. just a simple setting for Loans and Copies only.
(Note – although service level is offered on this subsequent screen, then this is redundant since we are defining the charges for a specified service level. This will be always set to the service level being used and protected).
In other words, it is expected that the extra charges are rather simply defined; however if the library really wish to charge normal users an extra 2.00 for a rush request, but EXTERNAL readers 3.40 for such a request, then they can!
If such charges are defined, this will be displayed in the header of the Rules screen:
After selecting the option an input form will be displayed:

This allows you to enter specific permutations for which to test the calculation e.g. a loan made payable on 25th May 2010 for an Adult borrower, for a monographic item, and so on.
After clicking , the result of entering these details is shown:

This is a screen with a tab for each type of charge calculation i.e. showing the charge to Supply such an item, the expected charge on the library, the charge that will be made to the borrower and finally the charge that would be made if charged to a budget.
Charges for outgoing interlibrary loan requests may be charged to departmental budgets rather than being made payable by the individual requesting.
Whether a request is payable by the borrower or charged to a budget is set on an individual request or may be presented as an option in the WebOpac when the borrower is placing their own request.
This section describes how budgets are maintained and used within the system. In the following “department” refers to an organisational department (within university or company). When the ILL department is referred to, the full “ILL department” will be written.
Budgets are defined for the circulation metainstitution and may therefore be shared by multiple ILL departments.
After selecting this option, a summary screen will be displayed:
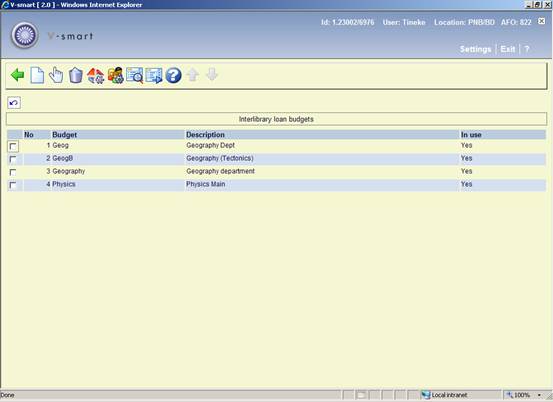
: Choose this option to define a new budget. See section 822.8.1.
: Select a code and then this option to modify the general properties of the budget. See section 822.8.1.
: Select a code and then this option to delete the code. The system will prompt for confirmation.
: The department setup allows individual budgets to be linked to a department, as defined in AFO 482. See section 822.8.2.
: It is possible to configure the WebOpac to allow borrowers to select a budget code against which the charge should be made. See section 822.8.3.
: Takes the user to the invoice display screens. See section 822.8.4.
: Takes the user to the invoice processing screens. See section 822.8.5.
After selecting the or option, an input form will be displayed:

Budget code: A unique code to identify the budget.
Budget description: A brief description of the budget.
Budget in use: Whether or not the budget is in use.
Invoice main document: Enter the name of the main mailmerge document that defines the layout of the invoice associated with this budget. Thus for the “single” invoice case, the layout would be very different from a regular invoice to a library. (See also the general help on mailmerge).
Name and Address for invoicing: are optional fields and are available as fields to be printed on an invoice (as BillingName and BillingAddress fields)
Email address and Use email for invoicing: allow you to send the invoice by email.
: The department setup allows individual budgets to be linked to a department, as defined in AFO 482 – Borrower Authority Lists – Department.
After selecting this option a dropdown list with all departments is displayed:

After clicking the following form will be displayed:

ILL Budgets, ILL Budget prefixes: This defines which budgets comprise the department. These may be defined individually using the first input field, or by simply assigning a prefix. The prefix must end in *.
Invoice main document: Enter the name of the main mailmerge document that defines the layout of the invoice associated with this department. Thus for the “single” invoice case, the layout would be very different from a regular invoice to a library. (See also the general help on mailmerge).
Name and Address for invoicing: are optional fields and are available as fields to be printed on an invoice (as BillingName and BillingAddress fields)
Email address and Use email for invoicing: allow you to send the invoice by email.
No limits are placed on which codes are linked to which department – a specific budget code MAY be valid for several departments.
In addition, this setting enables the system to determine which budgets to offer when adding budget codes to a borrower record.
: It is possible to configure the WebOpac to allow borrowers to select a budget code against which the charge should be made. Assuming this option in the WebOpac is in use, then it may be valid only for certain borrower categories.
After choosing this option a selection form is displayed:

Indicate whether this is allowed for each borrower category.
· In case there are more than 15 borrower categories, there will be a button to go to the next screen.
· The button allows you to go directly to a specific borrower category.
: Select a budget and then this option, a summary screen will be displayed:
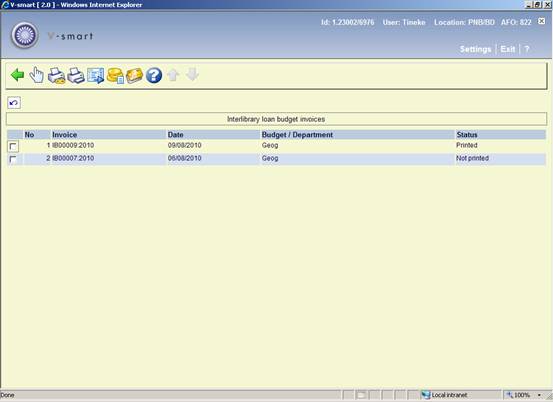
: Select a line and then this option to display the requests associated with the invoice. See section 822.8.4.1.
: Use this option to print all invoices as yet unprinted. The standard screen for generating mailmerged output will be presented. (See also the general help on mailmerge).
: Select a line and then this option to print the invoice. The standard screen for generating mailmerged output will be presented. (See also the general help on mailmerge).
: job is a standard “batch task” in Vubis – it may be run online, in batch or as a regularly scheduled task in “memory”. See section 822.8.4.2.
: Select a line and then this option to pay the invoice. See section 822.8.4.3.
: This option is not yet implemented.
: Select a line and then this option to display the requests associated with the invoice.
: This option is not valid here.
: Select a line and then this option to display the details of the request. See the help of AFO 821 for an explanation of this functionality.
: This option allows the user to search for a specific set of requests. After choosing this option, a selection form is displayed:

Select the required criterion and click , the system takes you the screen nearest to the searched for request.
: job is a standard “batch task” in Vubis – it may be run online, in batch or as a regularly scheduled task in “memory”. When you choose this option, the standard screen for scheduling jobs will be displayed.
Note
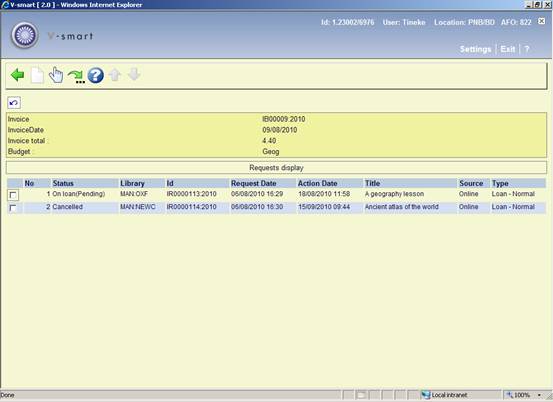
For each ILL department on the system, the process will select all requests for which the payment is to be made to a budget account, which is ready for payment (i.e. payable) and obviously previously not invoiced.
The selection run will process requests up to but NOT including those entered “today” – to ensure that the “boundaries” of the invoice are clear - that is, for a given day, requests will not be invoiced across multiple invoices (for one budget).
Separate invoices are then generated for each budget, totalling the individual requests for that budget code, or are aggregated according to the “Group by department” setting.
: Select a line and then this option to pay the invoice. An input form will be displayed to allow a record of the payment to be recorded against the invoice

If the invoice has already been marked as paid, the previously entered details are redisplayed and may be amended.
: Takes the user to the invoice processing screen. The difference with the above option is that a listing is shown of invoices for all budgets.
The options are the same as described above for invoices of an individual budget.

In this section you can define various languages. These settings may be assigned to a library, and may then be used to allocate wording on the output notices appropriate to this language code. Thus for example, it is possible to define, say, overdue notices in Japanese which would then be printed for libraries with that language code set.
After selecting this option, a summary screen will be displayed:

: Choose this option to define a new language. See section 822.9.1.
: Select a code and then this option to view / modify the details of the code. See section 822.9.1.
: Select a code and then this option to delete the code. The system will prompt for confirmation.
After selecting the or option, an input form will be displayed:
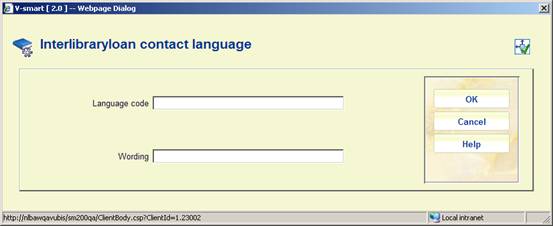
Enter a unique Language code and a Wording.
The interlibrary loan module provides support for the document delivery function. This process sits somewhere between the management of incoming requests and outgoing requests. For document delivery we are concerned with the supply of library material externally to library users – typically corporate organizations e.g. when the library supplies material to, say, a law firm.
This is often managed by an interlibrary loan department, and so falls into the general management functions of interlibrary loan.
After choosing this menu option, a selection form will be displayed:
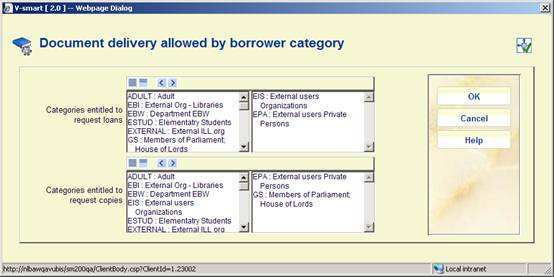
From this screen it is possible to tell the system which borrower categories may enter requests for loans in this way and/or for copies in this way.
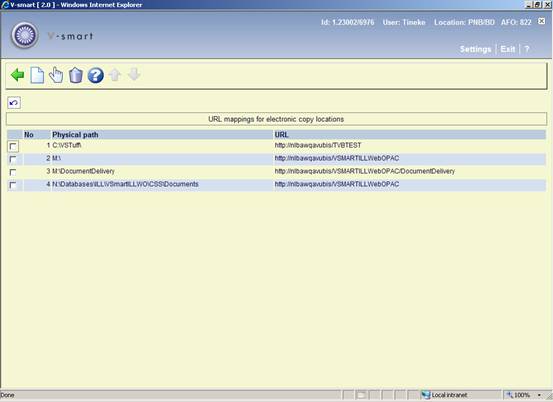
It is possible to link the receipt or supply of an electronic copy to the actual location on (say) a network of the copy (e.g. where the .pdf resides). In order to allow these to be retrieved by a user from the WebOpac, these must be presented as a URL. This setting allows you to link a physical location to a Webserver address.
After selecting this option, a summary screen will be displayed:
: Choose this option to define a new path. See section 822.11.1.
: Select a code and then this option to view / modify the details of the path. See section 822.11.1.
: Select a code and then this option to delete the code. The system will prompt for confirmation.
After selecting the or option, an input form will be displayed:

Full path for copy location: Enter the full path for the physical location of files.
Full URL for copy location: Enter the URL for the virtual directory.
In the above example, files physically located at “M:\DocumentDelivery” are defined in the virtual directory “http://nlbawqavubis/VSMARTILLWebOPAC/DocumentDelivery”
If this mapping is found, then such a copy will be offered for online display from the WebOpac.
· Document control - Change History
|
Version |
Date |
Change description |
Author |
|
1.0 |
October 2010 |
new AFO |
|